Jaffa Sketchwalk and Tips for Beginner Urban Sketchers

On Friday we went to an Urban Sketchers outing in Jaffa. It was celebrating local designers, and there were street performances as well as open studios and an arts and crafts market. The weather was hot and sunny, and the place was pretty packed with people and full of interesting old buildings. The main trouble I had was focusing on what to draw, as there were so many subjects.

I took a new sketchbook, a Pith Oroblanco in A4 size, and an A5 portrait Etchr Labs 100% cotton watercolour sketchbook. I don’t normally work in such a large format, but I decided to challenge myself to use the Oroblanco as much as possible. The 170gsm paper is identical to the one in the smaller Pith Kabosu, and so is great for mixed media and light washes. The Etchr Labs sketchbook is the best watercolour sketchbook that I’ve ever used – the paper works wonderfully with washes, and is very forgiving for mistakes and reworking.

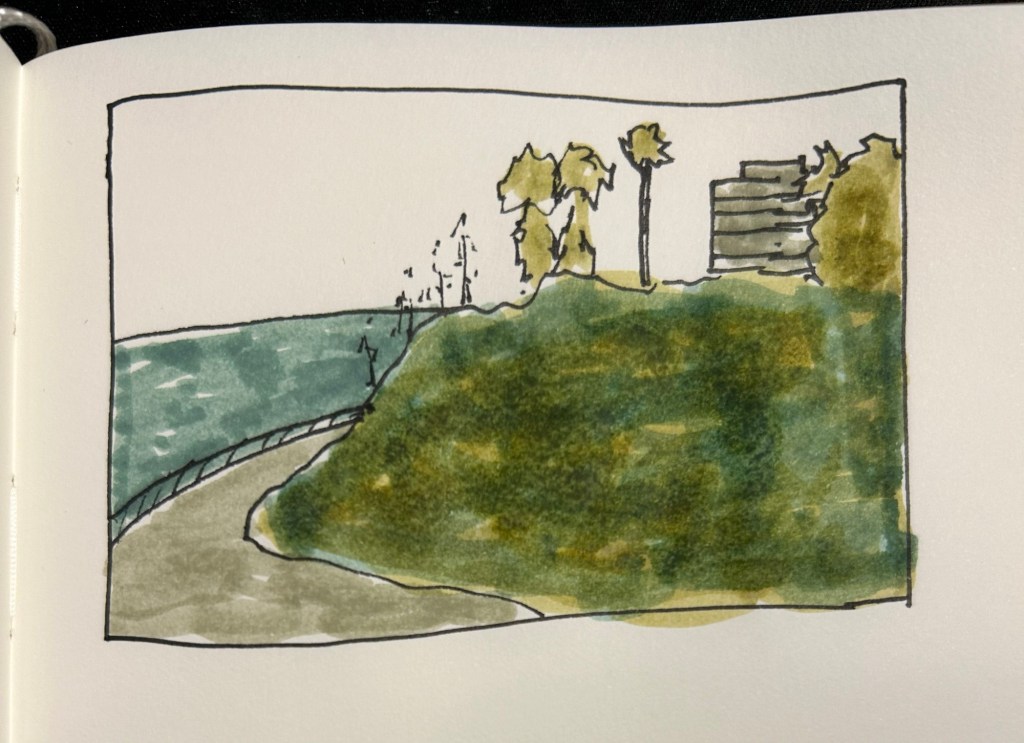
I started out 30 minutes before the official start time, and sketched a local building. I liked the combination of the beautiful old stone building together with the graffiti and the semi wild trees and shrubs. Inspired by Liz Steel’s Patreon sketching community (I just joined it) and December’s theme of “Red” I selected to sketch this building with Diamine Inkvent 2025 Day 3’s Carousel – a red ink – and to highlight the rust colour in the shutters and door. I had enough time to finish the line sketch before going to say hello to Marina, our local chapter head and the organizer of this sketchwalk (a wonderful person and artist). I took reference photos just in case, and then returned and quickly finished the sketch:

First sketch on a Pith Oroblanco

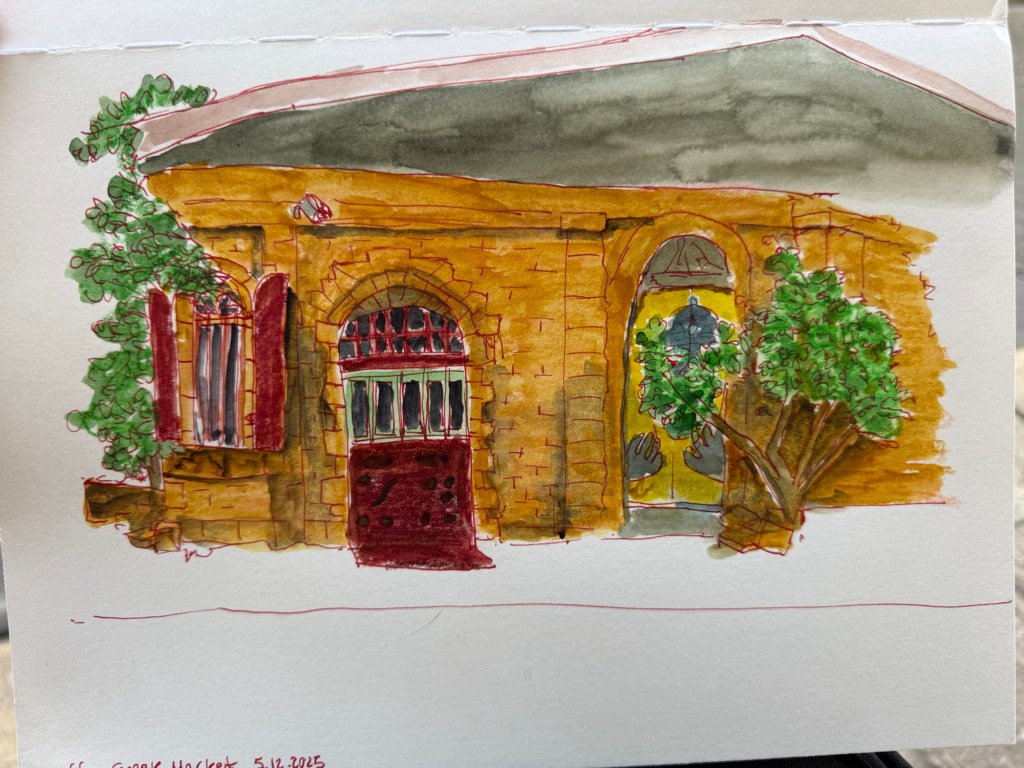
To avoid having to lay down a large wash I used Caran d’Ache Neocolor II to lay in most of the base colour – except for the roof bit (where you can see why laying down a large wash on this paper was problematic).

Initial sketch.

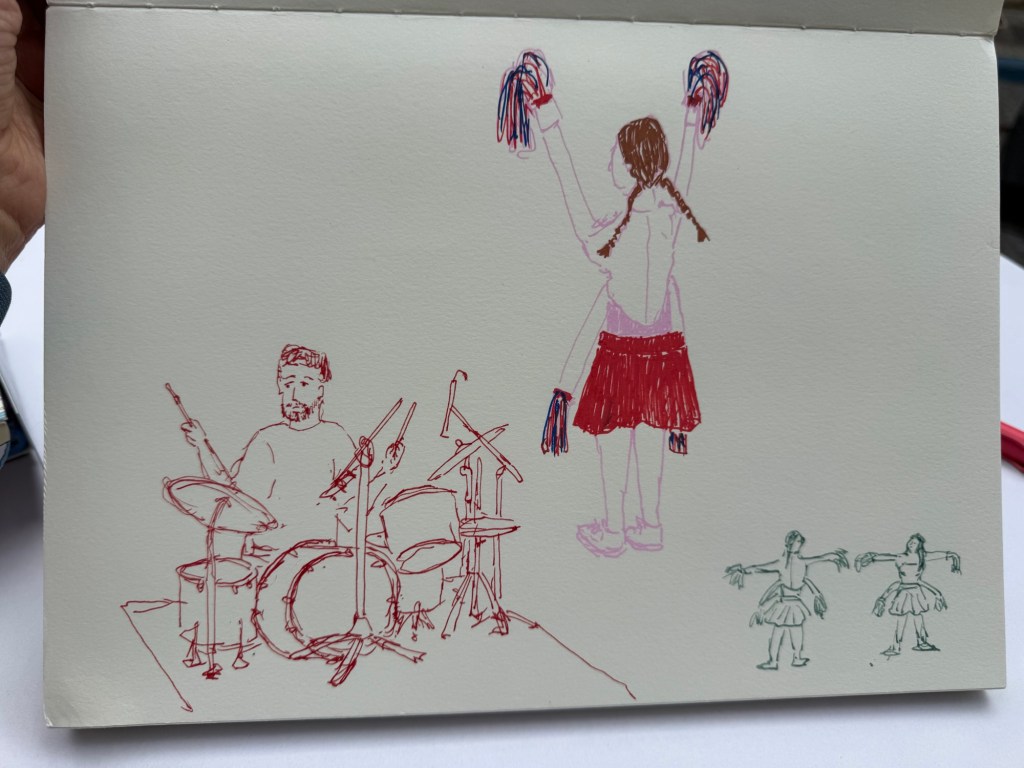
I then went in search for the music performance that was supposed to take place in an adjacent street. I managed to sketch the drummer as he was doing a sound check, but then he left and two girls in peculiar 4 armed cheerleader outfits came out and did a sort of otherworldly dance-march. They kept moving but I did manage to capture them. I used Diamine Carousel in a Lamy Safari medium nib for the drummer, and Posca markers for the cheerleader. The tiny cheerleader thumbnail was sketched with a TWSBI Eco 1.1 fountain pen and De Atramentis Document Ink Green Grey.

Quick, loose sketches

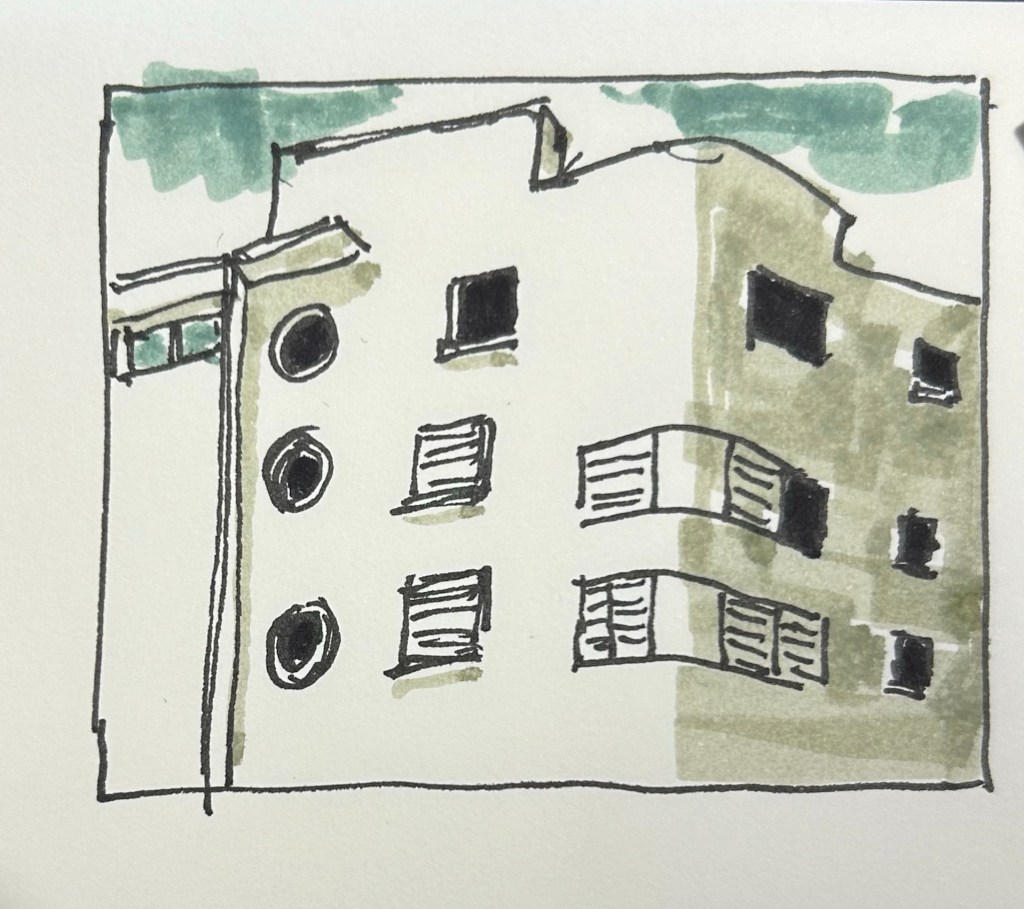
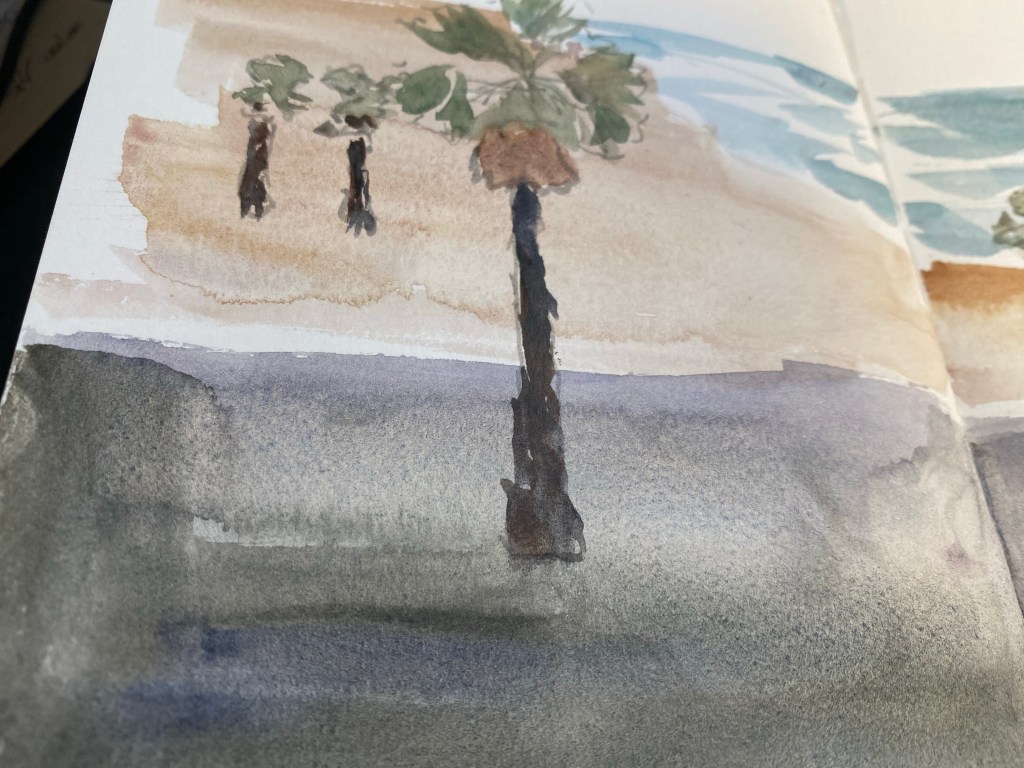
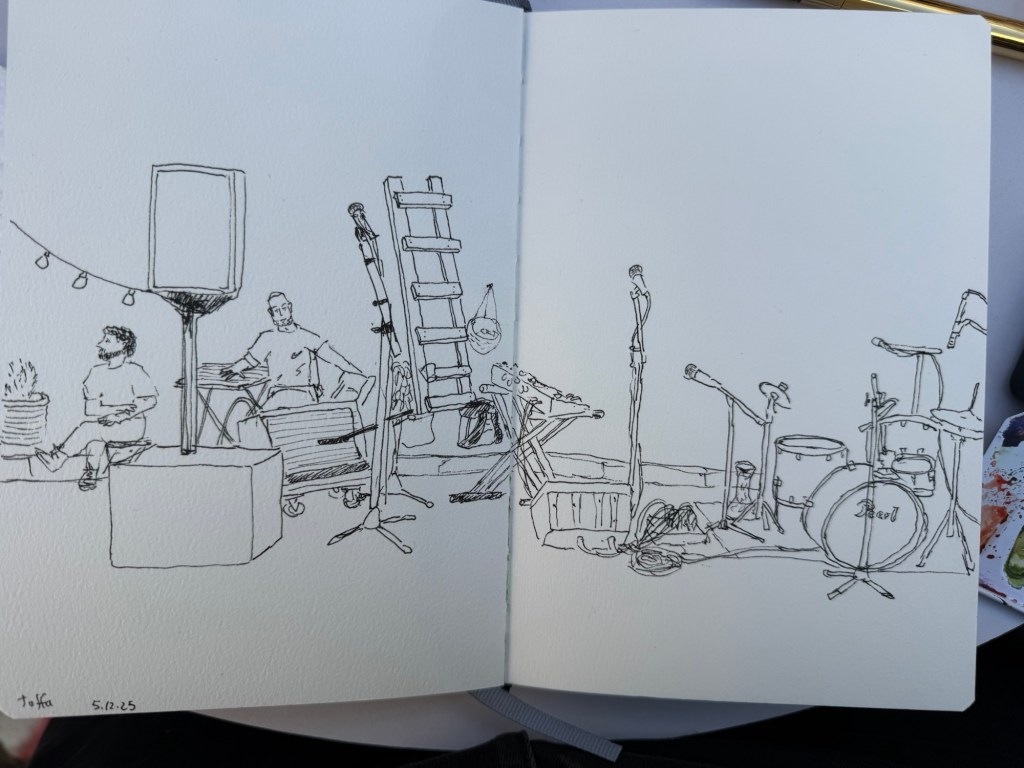
I then settled in to prepare to sketch the musicians when they returned. There was a Flamenco dancer in a nearby stage, but the place was too crowded for me to get a good viewing angle of her dancing so I spent the time creating a detailed fountain pen and watercolour sketch of the location where the musicians were supposed to play in. I was hoping to add them in once they started, but their show was delayed and i had to get back to the throwdown. I did get a sketch of their instruments and some local viewers, but I rushed in the end and didn’t get a chance to get proper shadows in. Oh well.

Watercolour sketch

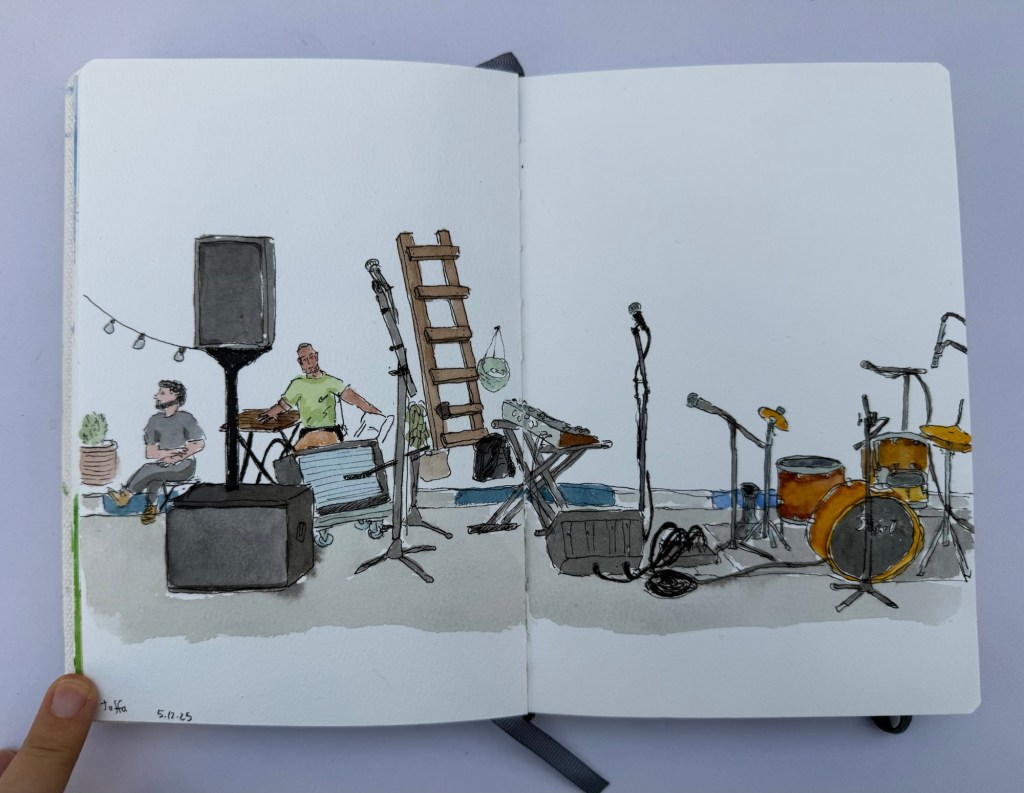
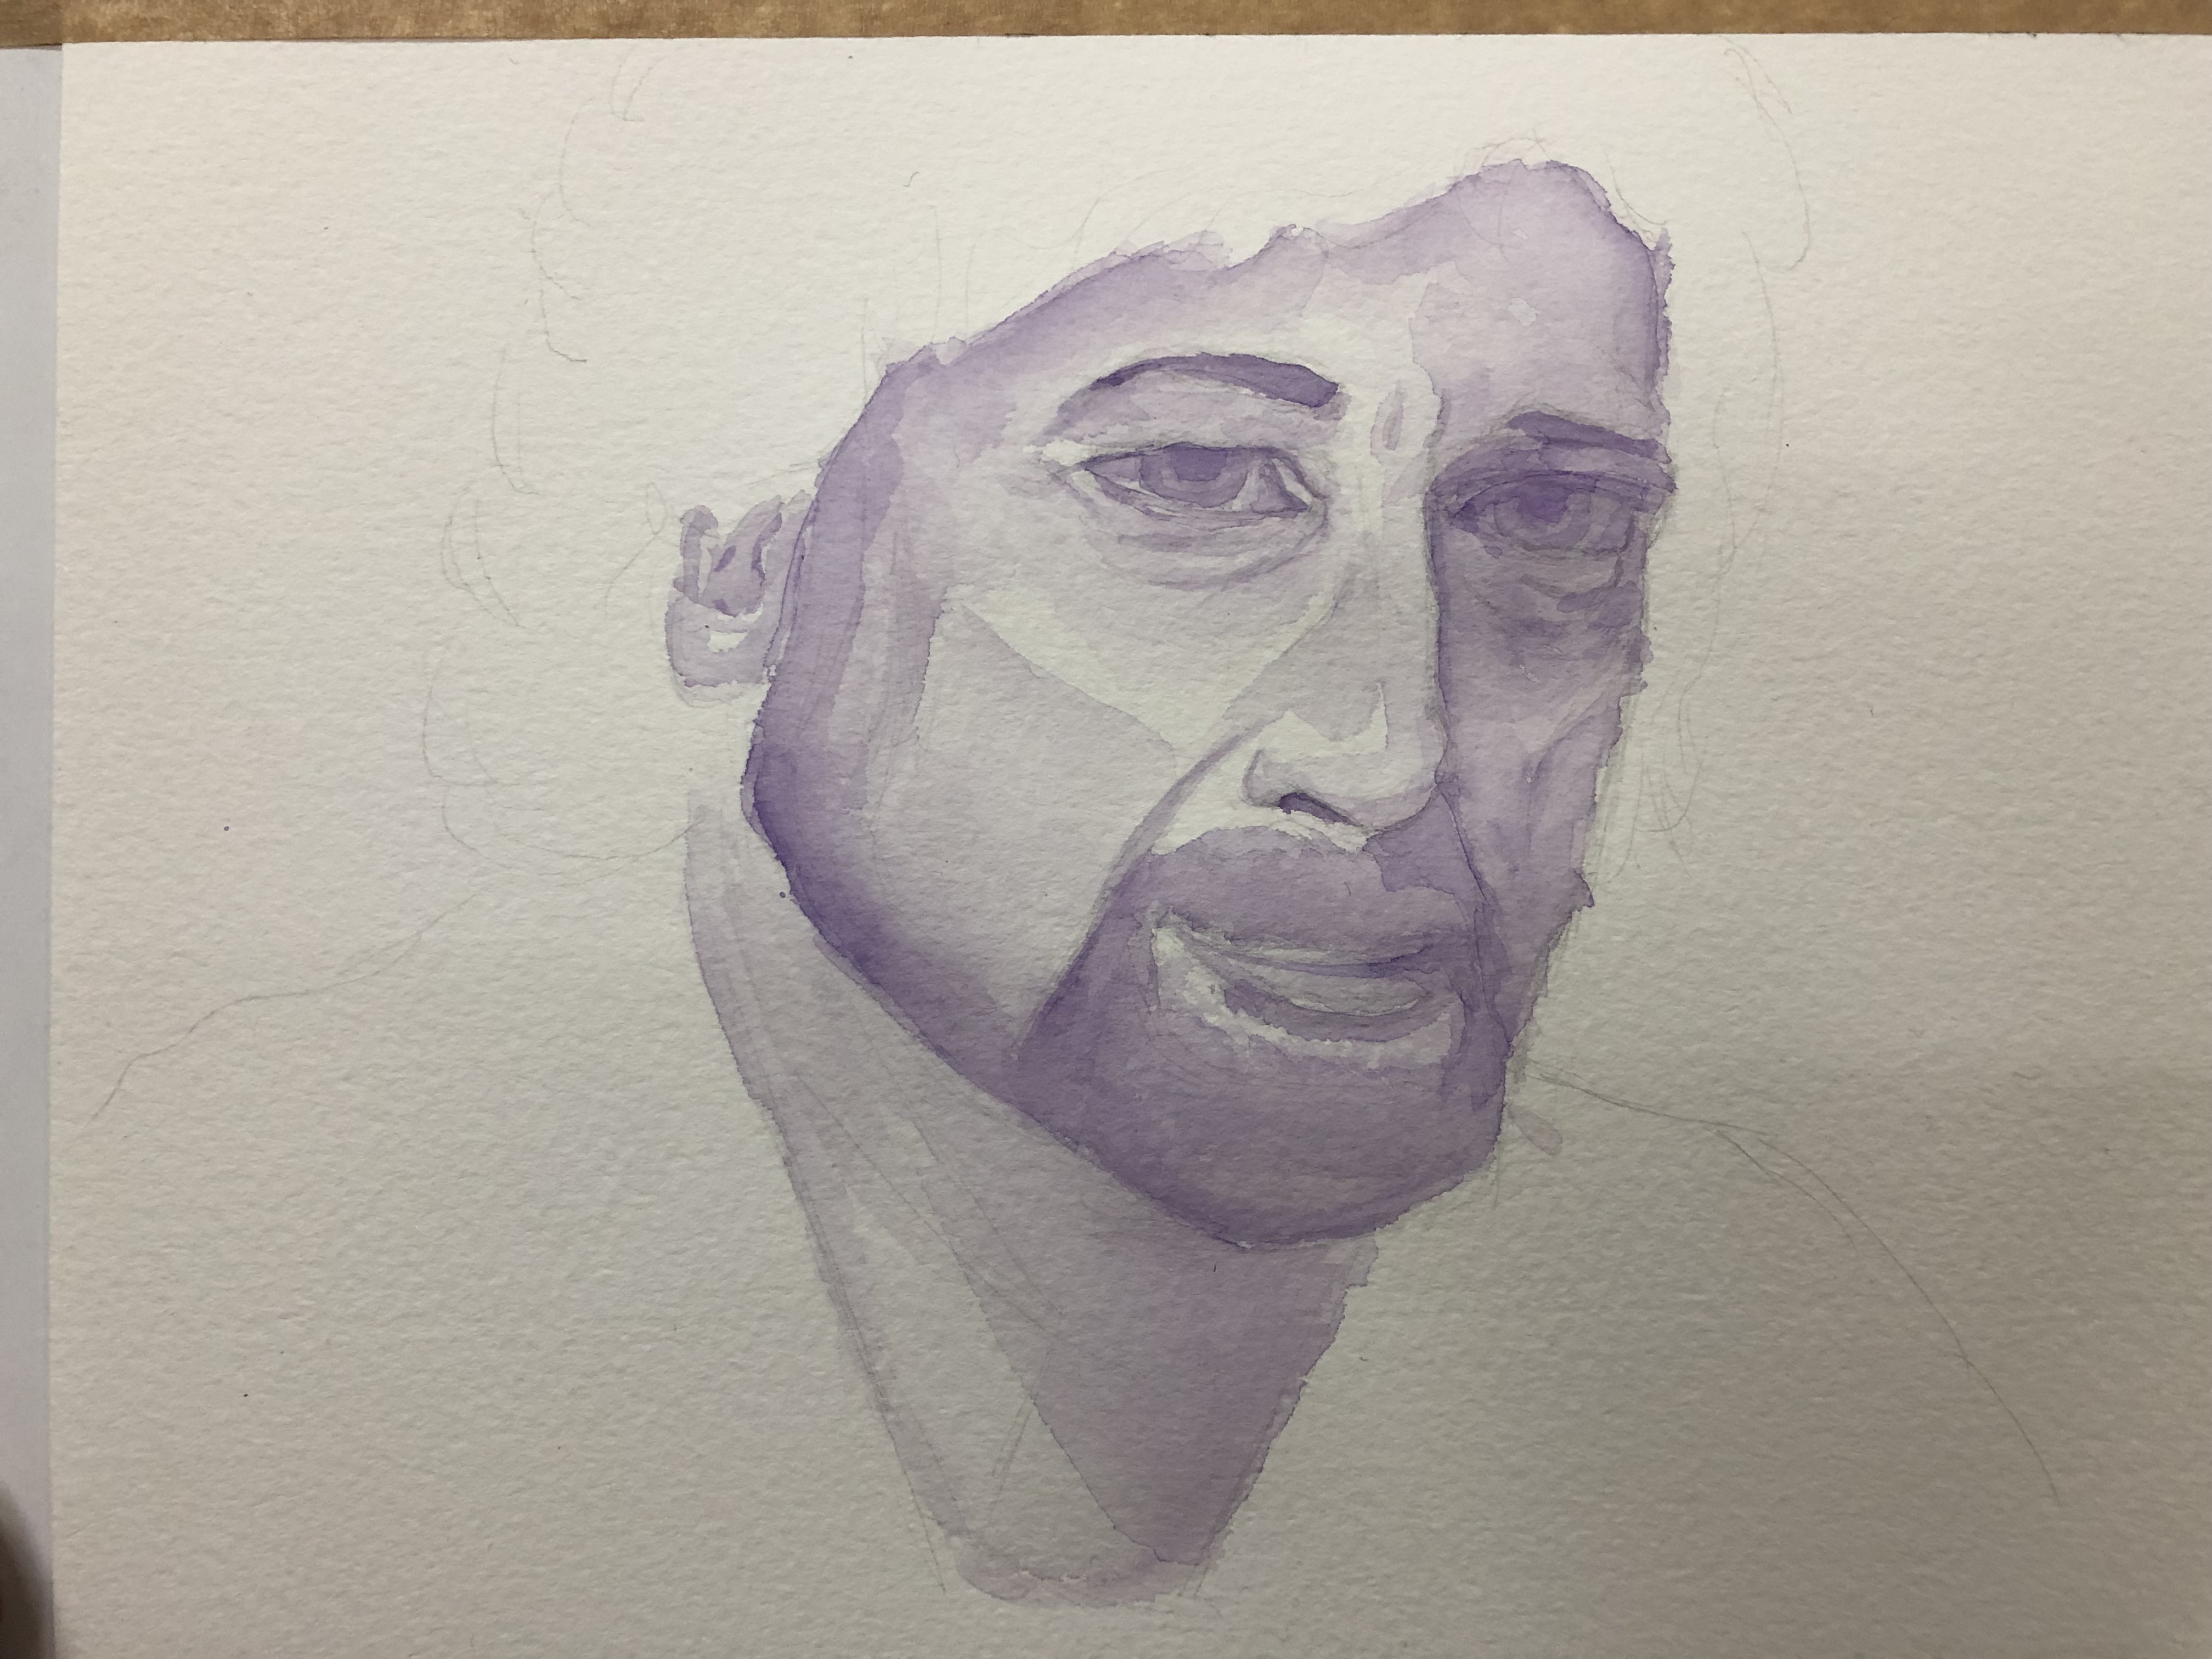
The line work was done with a Platinum Preppy 0.3 filled with De Atramentis Document Ink Black on an Etchr sketchbook:

Ink sketch

There was a lady there that was clearly on her first every Sketchwalk, and my heart went to her. Seeing her struggle made me realize that there are so many things that are obvious to me as a seasoned “sketchwalker” that aren’t obvious to people going out with an Urban Sketchers chapter for the first time. Here are a few useful tips:

  • Say hello. Sketchwalks start at a meeting point and usually end in the same one. Come a few minutes early and talk to people – they’re usually nice and friendly and share many of your interests. Say hello and introduce yourself to the organizers, and thank them for organizing the walk – it’s a lot of work! If there’s a local special event that’s taking place during the walk, be sure to get the details of the time and place and be there. Even if you don’t end up sketching the event, there is bound to be something else interesting going on, and you’ll help represent the chapter. If you come in late and miss the initial gathering, find a sketcher in the area and politely ask when and where the end meeting is. It’s usually posted in advance, but it is worth double checking.
  • There’s a throwdown in the end of sketchwalk, and group photo. Even if you don’t like your picture taken, bring your sketches to the throwdown. It’s a great way to see great sketches in a large range of styles, and get inspiration from wonderful artists. Do not compare your work to others. Be generous and specific with complements (“The way you caught the energy between the dancers is amazing!”, “The colour choices are phenomenal – that building really comes to life!” is better than “that’s so pretty!” Although, of course saying a sketch is beautiful is also nice). Take photos not just of your work, but of other’s work that inspires you, especially of those that do work in a style that’s far from your own. Learning and experimentation is part of the Urban Sketchers experience.
  • Thank the organizers. I know I said that before, it’s worth repeating.
  • Never ever critique another artist’s work. It’s not that kind of an artistic gathering.
  • Bring less. We all fail at this (I did too, of course), but the less stuff you bring the more fun you’ll have. Choose one or two sketchbooks, at least one in a size and format you are comfortable with. Bring only the supplies you know you’ll use, not those that you might need. It’s OK to bring something new with you, but if you do I suggest that you force yourself to actually use it, and start the first sketch with it.
  • Do not bring an easel, particularly not to your first sketchwalk. You want to be mobile and flexible. The best way to get the most out of a sketchwalk is to change locations at least 2-3 times. The idea is to work quickly and loosely and to capture a location from several angles and with different focuses (that’s why it’s called a sketch walk). There will be those that choose to stick to one location, but having an easel tends to force you into a single location, as does having too much gear.
  • Bring a stool. It doesn’t have to be the most comfortable one in the world, but it does have to be portable. That will allow you to sketch wherever you like, and not just where there’s a free bench or table.
  • Take reference photos, in case you don’t get to finish a sketch or the lighting changes, or a white van decides to park in front of the building that you were just sketching.
  • Talk to people. Share art supplies. Ask questions about their process – unless you see that are too absorbed in their work to answer. But people usually are kind and enjoy sharing information and tools with other sketchers. That being said, bring all the gear that you’ll actually need.
  • If you’re just starting out sketchwalking, use smaller formats (no larger than A5), sketchbooks and not loose paper, and supplies that are portable and well known to you. That will allow you to work faster, and it will give you a chance to get more comfortable with working on location.
  • Sketchwalks usually last 3 hours. That’s both a lot of time and not enough time. Keep an eye on the clock, take into account that it takes time to warm up, and be kind to yourself, especially during the first 30 minutes. I usually take the first hour to work very quickly and loosely, and leave the last hour, hour and a half to work on a more detailed, well composed piece. Take breaks – sketchwalks are in urban environments so there’s usually a place to grab a coffee and snack (which you can and should sketch – it’s an Urban Sketcher’s tradition!). It’s not a race – the point is to enjoy yourself. I usually take a few minutes to stroll around, getting a feel for the location and the options before I settle in and get to work.
  • Bring water and weather appropriate gear. Be a responsible adult and check the weather before you go. Bring a hat and sunscreen, coat, umbrella, etc depending on the weather.
  • Post to social media, and tag your local chapter. There’s usually a Facebook group, and an Instagram account for the USK chapter. If the sketchwalk involved a local business, museum or organization, be sure to tag them too. You are an ambassador to the community now. Represent this wonderful organization with pride.

If you go on Urban Sketcher Sketchwalks and have tips for newcomers, I would love it if you could reply with them.

Weekly Update – Baristas and Cats and Plays, Oh My

Long time no update so this one contains multitudes.

I have started taking a small sketching kit with me on my long runs. I take my Pith Kabosu, Aquarius Urban Sketchers watercolour palette, a fineliner of some sort, a waterbrush and a Pentel P209 mechanical pencil. I finish my runs at my local cafe and sketch there over a sandwich and coffee.

My favourite barista at work

Here’s the preliminary sketch, done in pencil and a 0.5 fineliner:

I am really enjoying my Pith sketchbook, and I’ve been taking it with me almost every day and sketching a lot more. My brother’s cat:

Another sketch at the cafe, this time of a customer:

While I’ve been sketching a lot more since the Urban Sketcher’s Poznan symposium, my journaling has taken a big hit. This oftentimes happens to me after traveling, as I rarely have time for regular journaling during a trip, and I often replace writing with sketching when traveling. The issue is that this time I’ve been struggling to return to the habit, mostly because I’ve picked up a few bad habits during the last two months of travel and chaos.

As many in the Urban Sketchers community use Instagram I started using the app before the symposium (I didn’t have it installed on my phone beforehand), and I got into the unfortunate habit of using it. Earlier this week I deleted it and logged out of YouTube on my phone, as I’ve been wasting time on there too. It’s been a relief – I’m not posting my sketches there, but I realized that I don’t really have an audience there – I’m just unpaid labour for billionaires. It’s bad enough that AI bots are scraping my site for content, but I don’t see a reason why I should allow my brain to be addicted to the slot machine tactics of an ecosystem that relies on me spending as much time as possible there to make its money.

My planning also took a hit due to travel, but I’ve gradually gotten things on track. My Q4 planning was about two weeks late, but as these were holiday weeks it wasn’t a big deal. I’ve also scaled down my plans to better accommodate holidays and travel.

Lest you think that I only go to plays when I’m abroad, I did catch two plays during the past two weeks. One was a wonderful community theatre staging of “Twisted”, performed during the local “comicon” – a sci-fi, fantasy and roleplaying game convention that happens once a year.

Twisted cast.

Twisted is a StarKid musical that is a funny, profanity full take of Aladdin from Jafar’s point of view. One of the striking things about it is that it highlights the actual problem points with the original plot.

Speaking of that convention, I also got to give a lecture, run a tabletop RPG (a Dungeon World adventure that I wrote and ran), help master a LARP and meet a lot of cool friends. Oh, and sell a good amount of books that I no longer needed. Yay to more room on my overcrowded shelves!

This week I got to see a play at the local theatre, “The Beauty Queen of Jerusalem”. The play is based on a bestseller by the same name, and there has already been a TV series on the saga of the Ermoza family. While the actors were good, I thought that the play lacked depth, likely because the story needed more time to unfold.

The cast of The Beauty Queen of Jerusalem

This morning I went on a walk before my usual swim. This sketch was made using a combination of Aquarius watercolours, Caran d’Ache neocolor II crayons, a Tombow brush pen and a 0.5 fineliner, all on a Pith Kabosu sketchbook.

We’ve been having some stunning sunsets lately. Have a great and peaceful week!

Stabilo Boss NatureCOLORS Review – Can Highlighers Be Used for Sketching

Stabilo make THE highlighters – Stabilo Boss – chunky, reliable, classic. Over the years they’ve added pastel colours to their original neon coloured highlighters, and just recently they’ve expanded their pastel highlighter lineup to include the NatureCOLORS. The NatureCOLORS lineup can be bought separately, or in a wallet of all 6 new colours, or a wallet of 8 that includes two black “marker” pen. The 6 new colours are Warm Grey, Earth Green, Mud Green, Beige, Umber and Sienna. The black “marker” is just an opaque black “highlighter”.

From top to bottom, black marker, warm grey, mud green, earth green.

I first saw these in a bookstore in Paris, and while I hardly ever use highlighters, the black marker and the natural tone of the other highlighters made me buy four of them to try out while sketching. As usual with Stabilo, there’s no indication on the pen body what colour it is beyond the colour of the pen body and a number that you have to look up on their site.

Testing the pens out

I used these pens for quick landscape thumbnails and sketches, and they work pretty well with a few caveats:

  1. They bleed through everything but the thickest paper.
  2. They spread on almost every paper.
  3. They aren’t archival (so they will fade and discolour with time)
  4. They are chunky, which means they aren’t the most portable of pens (even though they’re light)
  5. They can be awkward to hold and manipulate at times.
Bleedthrough

They’re also not at all built for layering and mixing, which means that trying to create layers with them will just leave you with a soggy paper mess:

They don’t layer well, as evidenced by the grassy hill in this sketch.

So what are they good for? They work well for quick impression sketches, particularly of buildings, where you can get shading and shadows down very quickly. I used them on an architecture walk to get an impression of the buildings and they worked very well.

What they’re good at – blocking the windows, shading the building, impression of a cloudy sky.

It’s difficult to be accurate with them, but in these sort of sketches I’m not looking for accuracy, just of an impression, a quick note of what I saw and what caught my eye. A photo is great, but it doesn’t highlight what made me stop and take a second look at a building.

They even work decently well on cream coloured paper.

Yes, copic markers could do the job, but they cost much, much more than a Stabilo Boss marker, they aren’t as readily available, and they dry out very quickly. Sometimes you need a cheap workhorse to get the job done, and for this new use I think the Stabilo Boss NatureCOLORS work just fine.

Schmincke Horadam Super-Granulating Watercolour Review

Schmincke recently came out with a new series of limited edition Horadam (artist grade) watercolour paints that are super-granulating.Granulation in watercolour is the an affect that is created when the pigments in the paint separate and settle in a diffused patten on the paper, oftentimes allowing other pigments that they are mixed with to show through. In my everyday watercolour palette Schmincke’s Ultramarine Finest (494) is a prime example of a granulating paint that I use both for its effect as an individual paint and when mixed with various browns and greens. The new 900 limited edition series of Horadam watercolours that Schmincke has issued is composed of 25 paints that are divided into five sets: Galaxy, Glacier, Deep Sea, Forest and Tundra. I decided to purchase all five sets out of curiosity, since limited editions in artist grade watercolours aren’t common, I already use Schmincke almost exclusively, and I’ve been embracing granulation more lately in my work.

The 5ml set boxes.

The paints can be purchased in individual 15ml tubes (which is a lot of watercolour paint), in fancy wooden boxed sets of 15ml tubes and in cardboard boxes of 5ml tubes, which is what was available at my local art supply shop and what suited me to buy anyway. 15ml of watercolour paint is a commitment, and artist grade watercolour in general and Schmincke in particular aren’t cheap. The paints aren’t sold in half pans, which I would have preferred over the tubes, and which means that you are going to need empty pans or a palette to use them.

Schmincke Galaxy set

The Galaxy set includes Galaxy Pink, Violet, Blue, Brown and Black. There are some naming peculariaries in this entire series of paints, such as the fact that the paints are super-granulating but the set is called: Supergranulation on the box, and Super Granulation by the dealers. In any case, like all the colours in this set the paints in the Galaxy set have good lightfastness. They are all non-staining (which means that they can easily be lifted off the paper), the Violet and Blue are semi transparent, the Pink and Brown and Black are semi-opaque. This is the most vibrant of the sets, but don’t believe the photos on the package or in the various marketing materials, none of the colours in any of these sets really pops or is as vibrant as they appear to be. All these colours tend towards naturalistic, landscape painting tones.

Schmincke Forest set

The colours in the Forest Set are: Olive, Green, Blue, Brown and Grey. They are all extremely lightfast, the Olive and the Brown are semi transparent, the Blue and the Grey are semi opaque and the Green is opaque. I have no idea why the Forest Brown (944) is called Forest Brown as it’s not a brown at all, it’s more of a greyish green. Forest Blue is also a misnomer, as it’s also a green, this time one that looks like it was mixed with indigo. This is the most monotone of the sets, though if you are focused on landscapes, there are some interesting greens here.

Schmincke Glacier set

The Glacier set boasts the best paint in the series in my opinion, the Glacier Green which is just a delicious paint to have on your palette – a phenomenal and unique green with pronounced brown undertones. I can’t wait to use it in my work, and I’ll be buying a 15ml tube of this. The rest of the colours in this set are Glacier Blue, Turquoise, Brown and Black. Despite what the marketing material may say, there is very little difference between the various blacks in these sets, and if I could I would have skipped all of them and used the Forest Grey and the Tundra Violet instead. All the colours in this set rate in the 4-5 star lightfastness range and all apart from the Brown (which is semi-staining) are non-staining. The Blue is semi-transparent, the Turquoise, Green and Black are semi-opaque and the Brown is opaque.

Schmincke Deep Sea set

The Deep Sea set features the following colours: Violet, Indigo, Blue, Green and Black. The Green here is a misnomer, as it’s also a blue (with only the slightest green tinge) and the violet is greyish and flat compared to the Glaxy Violet (and in any case if you’re looking for a vibrant violet look elsewhere in Schmincke’s lineup). This is probably the most redundant set of the five, and you can pretty much skip the colours here without missing on much. Indigo, Blue and Green are semi-transparent, Violet and Black are semi-opaque. Lightfastness is very good to excellent and non of these are staining.

Schmincke Tundra set

The Tundra set contains Orange, Pink, Violet, Blue and Green. Tundra Violet is another misnomer as the paint is practically black with a tinge of purple. This is the most staining set (Violet and Green are staining, the rest are semi-staining), but also a pretty mixable one. Orange, Blue and Pink are transparent, Violet is semi-transparent and only Green is opaque. It’s also one of the most compelling greens in the set, with it’s olive like tones and its pinkish undertones it’s both unique and generally useful for landscapes.

Paints on my palette and in half-pans

Schmincke aren’t selling these in pans, which is pretty inconvenient if you just want to swap one or two of these into your existing palette.

The paints in the series on Stillman and Birn Alpha paper

I first saw these paints on Schmincke’s Instagram and then on the Jackson’s Art blog. In both the paints are much more vibrant and with much more pronounced granulating, to the point of almost marbling, than what I got when I first created a the above reference drawing. I had a feeling that this was somewhat due to the extreme closeups that they took, and likely also the paper that they used.

Sketch on Stillman and Birn Alpha paper

In any case, since I and many others also use Stillman and Birn Alpha paper for watercolours, I decided to try and create a painting using these paints exclusively. In the end I also added Schmincke Indian Yellow (220) for the signs, but I didn’t mix it with anything else. As you can see, the granulation is still pretty pronounced throughout, but the colours, with the exception of the Glacier Blue aren’t exactly vibrant or saturated.

Paint samples on Magnani 1404 Toscana 100% cotton 300gsm rough cold press paper

I then decided to break out the good paper, and tested the paints on 100% cotton 300gsm cold pressed rough watercolour paper. Here you can see the granulation at its best, and yes, as promised it is pronounced in all of these paints. Yet as I suspected the choice of paper does nothing to make these paints more vibrant, which means that I certainly won’t be using them to replace large swaths of my current palette or recommending that you use them exclusively (especially since there are no yellows here and the red selection is pretty poor).

Paint palette on Magnani 1404 Toscana 100% cotton 300gsm rough cold press paper

Here are the paints all labeled (I got the Deep Sea Black and Green swabs out of order).

Sketch on Magnani 1404 Toscana 100% cotton 300gsm rough cold press paper

Here’s a very quick sketch with these paints on the cold press paper. They are built for washes and wet on wet work, and so relish this paper.

Sketch on Stillman and Birn Beta paper

And here they are on Stillmand and Birn Beta paper, which is better watercolour paper than the Alpha but still not good watercolour paper. You still get much of their effect here, especially if you don’t much around too much with the paint. These aren’t the best for mixing on the palette but do work well with layering and working wet on wet on the page. If you like to put down paint in washes and see what it does, these paints are for you. If you like to work in a more controlled fashion, you likely aren’t a fan of granulating watercolours anyway.

Closeup of granulation on Stillman and Birn Beta paper

You can see the granulation here, and some of the best colours in this set at work (Tundra Orange, Glacier Green, Tundra Violet, Forest Green, Tundra Green and Glacier Brown).

Closeup of granulation on Stillman and Birn Beta paper

Again you can see the granulation at work and how the effect lets the whiteness of the page show through, bringing light to a dark patch.

So, would I recommend all 25 paints? Of course not. Of the paints in these sets here are the ones that seem worthwhile:

963 Glacier Green (the best of the bunch!)

983 Tundra Violet (a great replacement for black in your palette, if you have it)

952 Deep Sea Indigo (bonus points for a transparent indigo with reddish purple undertones!)

964 Glacier Brown (the best brown of the bunch and the most saturated of them, with dark black green undertones)

942 Forest Green (a saturated green in a natural but not easy to mix colour with reddish undertones)

985 Tundra Green (a natural greyish yellow green that is not easy to mix and has brown undertones)

981 Tundra Orange (because this is a transparent paint in a colour that is rarely otherwise granulating, with pinkish undertones and a good generally useful hue that will work well in mixing).

If you’re looking to buy sets, the Tundra set and the Glacier set are the best in my opinion, but it depends on what colours you use most often in your palette.

Painting Minis

ReaperCon started yesterday and for the first time ever I’m actually able to participate. Yesterday I just listened to the classes, but today I jumped back in to painting minis.

This is the Reaper Bones Townsfolk Rioting Villager. After I took these photosI went back and softened the shading on his face a bit. I gave him a dirty, rusty pitchfork, and I tried not to take too much time on him (it still took longer than I would have liked). I also had a bad time with cutting off the mold lines, so I gave up after a few tries. In any case he’s not a display piece, but meant to be used in a game (when I can return to in person games).

He looks scary, right?

I made a wet palette out of an old takeout box, some paper towels and a bit of parchment paper. I’ll later improve on it, but for now it gets the job done. I’m also experimenting with a new of taking painting notes in a notebook, but l’ll see if it works before I write about it.

Wet palette.

Neil Gaiman Portrait (Work in Progress)

I decided to work on a monochrome Neil Gaiman watercolour portrait, and I remembered to take progress photos for a change.

The initial sketch was done with a Faber Castell 9000 2H on Bockingford 300gsm watercolour paper.

Then I did some light initial shading (I use Schmincke watercolours):

This is with most of the work done:

Final pass, differentiating more between light and dark: